Loading page header ... or Your browser does not support JavaScript
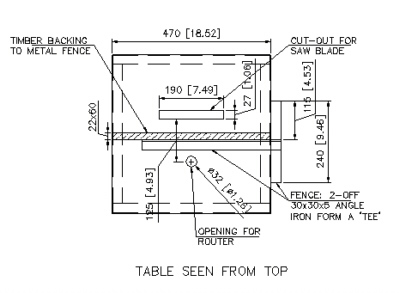
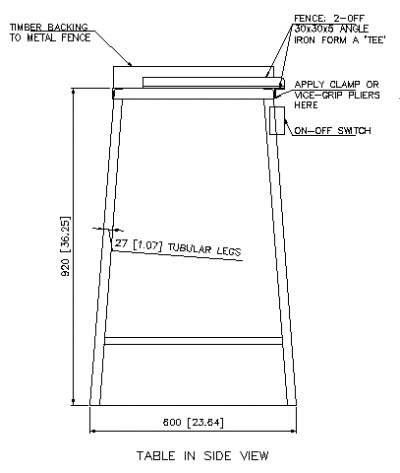
Hints and tips for the use of circular saws in boat-buildingI have given the router an excellent billing as the most versatile and useful to the boat builder in another place. Yet this does not mean that you can do away with other powertools or that there are not lots of operations you cannot also or sometimes better perform with a different tool. So lets look at the circular saw.A circular saw without a table is of fairly limited use. You may be lucky to have a proper table saw or be able to get one second hand cheaply, but mostly the budget will not stretch so far. Still there is another way, and that is to buy a 185mm / 7 1/4" circular saw and to build your own saw table. When you buy your saw check that there is no axial play in the shaft that carries the sawblade as this leads to an uneven saw kerf. Furthermore steer away from tools that only have a bush on that spindle - it won't last, you need needle or ball bearings, even if it costs a little more. The table is built so the saw fits into it from underneath. To fix it to the table I find it is easiest to drill two holes through table and the metal base of the saw and use bolts for fixing. For plywood this means using countersunk machine screws to keep the top flush and preferably threading the holes in the saw's base so you do not need to fiddle with loose nuts. You can weld studs (M10 or 3/8") into a steel table. This you do by first threading the holes so the studs are perfectly located. The weld is then done at the top of the table. The saw is fixed using just two nuts and a spanner. Using studs/machine screws means easy removal of the saw for the time you need it as a hand-held machine or if you want to mount the router in the same base - see Item 3-Template cutting... | |
|
When cutting the slot in the saw table top make sure it will accommodate the blade in the upright and tilted position for bevel cutting. The next important item is the fence. The simplest way to create a movable fence is this: At the front edge of the table fit a downstand ledge. Make up a simple fence in the form of a T-piece consisting of a downstand that engages with the ledge and the actual fence that is parallel to the sawblade. The picture shows details. You can use lumber and plywood or steel if you are comfortable with it. |
|
|
With this simple table and fence you only need a clamp or in the case of a steel table a vicegrip pliers to lock the fence in position. This simplicity avoids the sophisticated sliding arrangement for the fence but setting the fence takes a little longer. My table is steel and with the vice-grip I find adjustment is actually very quick. Two more things to bear in mind: You really need to mount an On/Off switch at the front of the saw table. Use copper wire twisted around the trigger switch to keep it in the 'run' position, but take care to undo it before removing from table. My saw table is the same height as a set of trestles I have. That is no coincidence as I made them like that. Long pieces of lumber or board can benefit from the support of the trestles and sometimes it is useful to have three supports of even height - the saw table does not mind working as a temporary trestle. |
|
| This very simple table will certainly do everything you need it for. If however you long for sophistication and my ideas kick off some further thinking and lead to improvements then this page already did its job! |
|
Loading first page footer ... or Your browser does not support JavaScript
Loading second page footer ... or Your browser does not support JavaScript