Loading page header ... or Your browser does not support JavaScript
| |
||||||
|
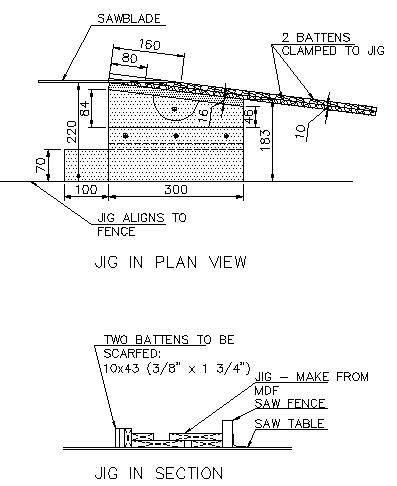
A scarfing jig for your circular saw The router jig presented on page 4 of Router tips will do the same job but having built it mainly for plywood it is a bit big to lug out for smaller jobs. The jig for the saw table is small and stores on a shelf ready for when you need to scarf some battens for the gunwale as an example. This is in fact what I made it for in the first place! | ||||||
|
The drawing at right shows the details, but a few words may help in understanding how it works: The principle of the jig is to keep the two battens clamped to it upright at the angle corresponging to the 1:8 slope. By moving the assembly along the saw's fence past the saw blade it cuts the scarf simultaneously on both parts. The parts of the jig are:
|
|
|||||
| By cutting both parts of the scarf at the same time any error in the angle from side to side gets generallly eliminated when the parts get assembled. Still, try and get things as square as possible. Always do a test run on scrap in any case to verify that the jig works as intended before cutting the 'good stuff'. The important dimensions can be replaced by these exact imperial ones (this is not a conversion table), these dimensions will achieve a 1:8 slope:
|
||||||
Loading first page footer ... or Your browser does not support JavaScript
Loading second page footer ... or Your browser does not support JavaScript